Managing Raw + Jpeg files in Lightroom

If you shoot Raw + Jpeg pairs, Lightroom, by default just imports the Raw file and treats the accompanying Jpeg file as a “sidecar” file, in much the same way as it does an XMP file containing metadata. You can’t actually access and use the Jpeg file this way. If you want to bring bring in both the Raw file and the JPEG file into Lightroom in a way that you can view and edit both, then you can do that by changing a setting in the preferences. When you make this change, Lightroom will bring both files in and treat them as separate images. In the rest of this post, I’ll show you how to turn this function on and off, and I’ll also show you some tips for managing Raw and Jpeg files in Lightroom.
Changing the settings to import Jpegs with your Raw files.
To tell Lightroom to import both the Jpeg files and the Raw files into the catalogue, you need to change one setting in Lightroom’s preferences. Here’s what to do.
- On the general tab locate the checkbox that says “Treat JPEG files next to raw files as separate photos”
- To enable this feature tick the checkbox. To disable it, uncheck this box.
- Close the preferences
Now when you go to import images from a memory card you’ll see both Raw files and Jpeg files in the import window and you can import both sets of images. This will bring in both files as if they were different images. Unlike Apple’s Aperture which pairs the images together, Raw + Jpeg pairs are treated completely separately, and will appear beside each other in the grid view. This might seem a bit messy, but there’s an easy way to manage this which I’ll get to in a minute.
Importing Jpegs for Existing Projects
If you’ve already imported a set of images and haven’t turned not he option to import matching Jpegs, you can tell Lightroom to import the corresponding files quite easily. 1. Enable the “Treat JPEG files next to raw files as separate photos” option in the preferences as outlined above. 2. Go to the folder that contains the Raw files for which you want to import the matching JPEGs. 3. In the folder panel, right click on the folder and choose “synchronise folder”
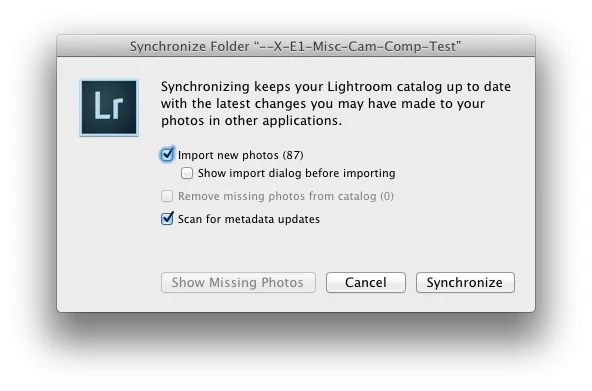
4. This will pop open a dialog which will ask you if you want to “Import new photos” - in this case the corresponding JPEGs. 5. With this option ticked, click OK to import the matching JPEGs.
When you click OK, Lightroom will begin importing the JPEG files, however be aware that it may take you to the “current import” collection in the catalogue panel.
You can disable this behaviour in the preferences, but doing so will disable if for all importing, so it won’t automatically go to the “current import” collection when importing from cards in general. The setting for this is just above the “Treat JPEG files next to raw files as separate photos” setting in the general tab of the preferences and is called: “Select the Current/Previous” import collection during import.
Switching between Raws and Jpeg files in the Grid view
To make managing the two sets of images a bit easier, you can decide to show only the JPEG files or the RAW files at any one time by using view filters in the grid view. This way you can focus on either the Raw files or the JPEG files. You need to be in the Grid view of the library to enable this filtering, but once you do you can switch to the Develop module and the filters will remain active. You can also save View presets so that you can quickly switch between showing just the Raw files or the JPEG files at any time easily (and in other modules). To Filter your images by type, here’s what to do:
- If you’re not already in grid view, switch to grid view by pressing “G” on the keyboard.
- Click on the “metadata” text to bring up the metadata options.
- By default, the Metadata options won’t show file type as one of the options, but that can easily be changed. If you hover over one of the column headers you’ll see little up and down arrows appear indicating that the column header is a popup menu. Click on this and you’ll get a list of available metadata to choose from. Select file type and the available file types will appear in the column. Select either Jpeg or Raw depending on which you want to view
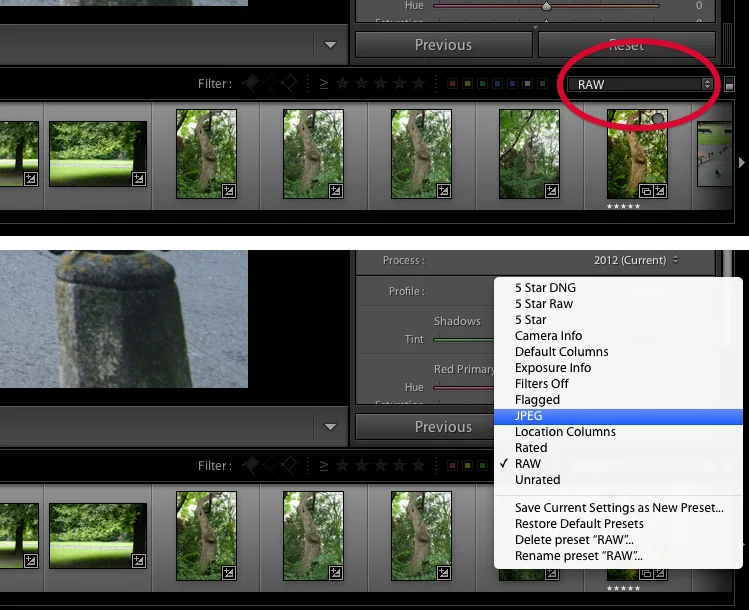
- You can save this as a preset to make it easier to find again. In the top of the filter section of the grid view, you’ll see a little popup menu called “Custom Filter”. Click on this to bring up the menu. Go to “Save Current Settings as New Preset…” and give it a name. Create one for Raw and one for JPEG
Once you have saved these presets you can call them up at any time by selecting them from the pop up at the top of the grid view in the Library module. They can also be selected from the pop-up on top of the film strip in other modules (it’s on the far right at the top of the film strip)
Some more ideas for managing Raw + Jpeg pairs
There are a couple of extras things you can do to manage Raw + Jpeg pairs. Here are two more ideas, without going into too much detail
- Manually create collections for both, and add them to a collection set named after the shoot.
- Add all your files to a collection, and then create smart collections for raw and jpeg files. (You want to limit the smart collection to only pick files from the collection with all the images in it - for more details on how to do this see this post.)
That’s about all there is to it. It’s pretty straight forward once you get the hang of it. I wish there was a way to toggle the option to import jpegs separately on the import dialog, so if you’re listening Adobe… :-)